Procedural Modeling in Houdini
Download Houdini File: Procedural Modeling for Beginners.hiplc
In the video titled, “Procedural Modeling for Beginners in Houdini” I demonstrated how to model a simple bottle geometry using a procedural workflow in Houdini and how to create custom parameters that can be used later on for scripting or just available simply for convenience.
VEX Code

Yellow Highlighted Edge Loop is the middle edges of the bottle that is automatically being selected by this VEX code
Below is the piece of VEX code used to automatically select the middle edge loop of the bottle, and is handy if any of the key parameters are changed for the geometry it would automatically select the correct edge loop to bevel the body of the geometry.
int totPts = npoints(0);
float ptsInEdgeSect = totPts / 4;
int midSect_firstPt = ptsInEdgeSect;
int midSect_lastPt = (ptsInEdgeSect*2);
for (int i=midSect_firstPt; i< midSect_lastPt-1; i++) {
    setedgegroup(0, "middle_edges", i, i+1, 1);
}
setedgegroup(0, "middle_edges", midSect_firstPt, midSect_lastPt-1, 1);
Code Analysis
Let’s start examining this piece of code function by function.
int npoints(<geometry>geometry)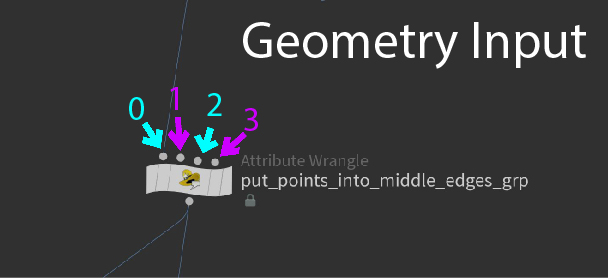
Geometry Index Number for Houdini Nodes
This function returns the total number of points at the time of the node.
The accepted parameter in the brackets is expecting the geometry input. (see screenshot on the right)
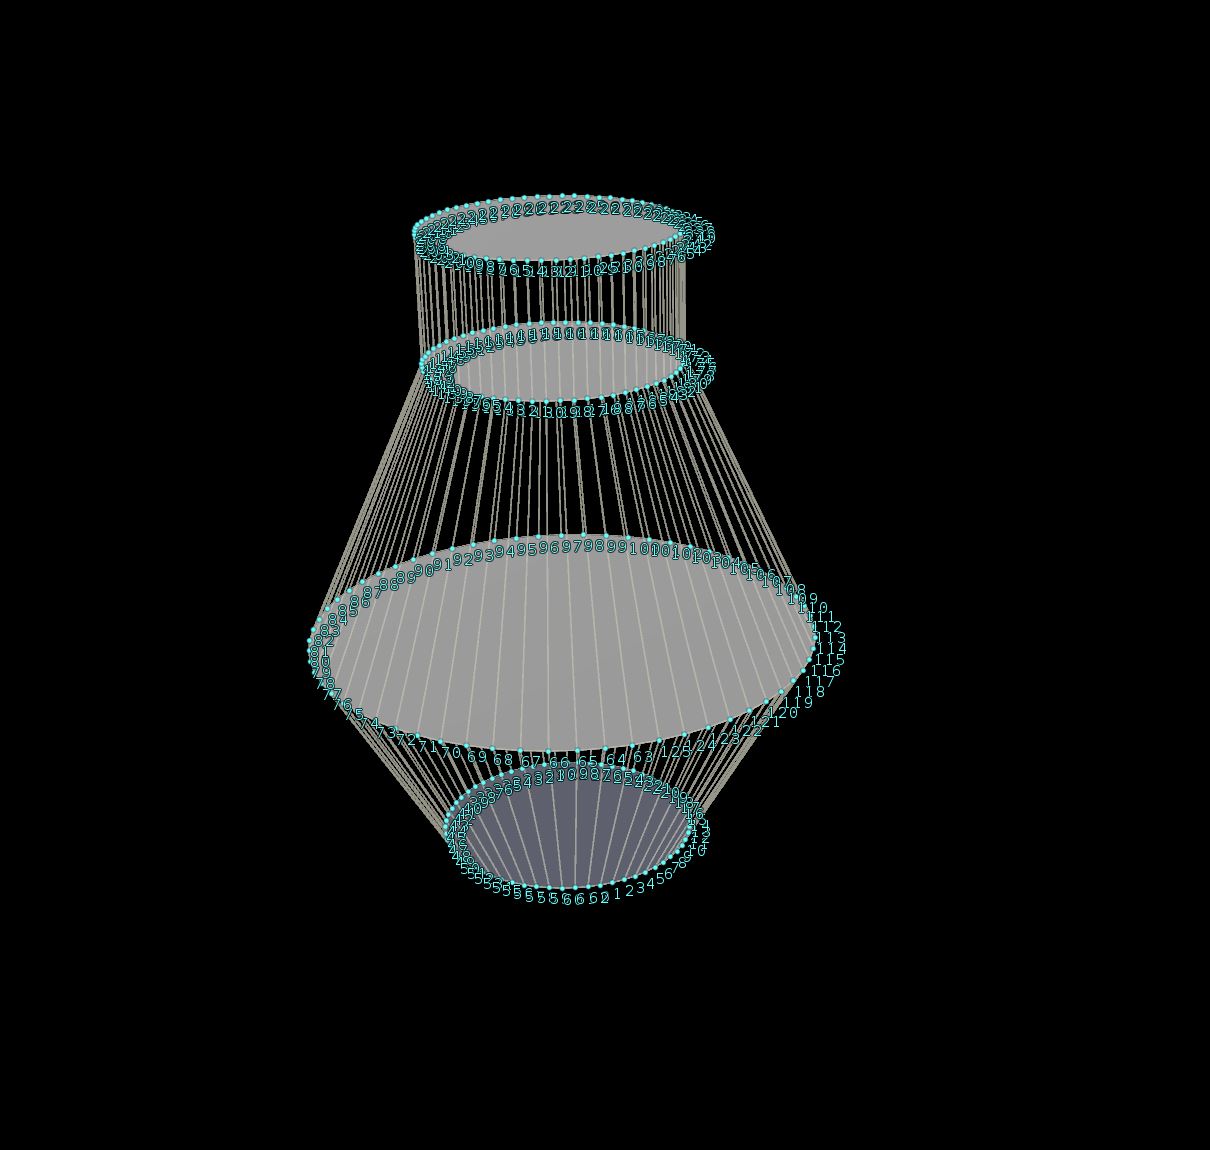
4 Circles making up the main shape of the bottle, 3D model (The first circle on the top is the 4th component, the extruded duplicate)
The whole bottle geometry is made of 3 key components and the 4th component is simply an extruded duplicate of the top face, which is what I am referring to the 3rd key component.

Houdini assigns Point Numbers in a sequential circular fashion
Houdini begins the point numbers from the bottom circle and counts sequentially around the circle in counter clockwise order and continues the point number assignment on the next circle in the same fashion.
Edge Loop Selection for Beveling (yellow highlighted edge loop)
This pattern of point number assignment makes it possible to predict what points are in the 2nd key component (the 2nd circle from bottom). This is the edge loop that we want to select and bevel in a procedural fashion.
float ptsInEdgeSect = totPts / 4;Therefore it makes it possible to take the “total number of points” and divide it by 4, because that would group the points between the four circles of the components of the bottle geometry.
Now that we know what are the point number groups, we need to specify a precise point number range to have a procedural piece of code to automatically select the edge loop of the 2nd circle (see screenshot on right with yellow highlighted edge loop).
int midSect_firstPt = ptsInEdgeSect;int midSect_lastPt = (ptsInEdgeSect*2);
Factors of Point Numbers
So I use the fact that the point numbers for the first circle will be a factor of the ‘ptsInEdgeSect’ we found in the previous line of code.
We need to beware that point number assignment always begins at zero. It is zero index based. This means the very first point number will always be zero.
Based on this factoring method, I know exactly that the 2nd key component of the 3D model (the 2nd circle) are the point numbers of the first and second factors of ‘ptsInEdgeSect”. In the screenshot on the right, ptsInEdgeSect has a value of 45 and the point numbers for the 2nd key component circle ranges from 45 to 90.
for (int i=midSect_firstPt; i< midSect_lastPt-1; i++) {
    setedgegroup(0, "middle_edges", i, i+1, 1);
}
setedgegroup(0, "middle_edges", midSect_firstPt, midSect_lastPt-1, 1);
This last bit of code is the easy part. It simply takes the range we found in the previous line and makes a counting for loop to put each point number in our range into an edge group.
int setedgegroup(int geohandle, string name, int pt0, int pt1, int value)geohandle
So again, the ‘geohandle’ is the input number. (see screenshot on right)
Next is the ‘string name’, which is “middle_edges”.
int pt0, int pt1pt0 and pt1 are the points that make up the edge.
int valueAs for ‘value’ that is value we assign to this edge in our edge group. So all the edges that are included in our ‘middle_edges’ group will have a value of 1 and the edges that are not in the group will have a default value of 0.
setedgegroup(0, "middle_edges", midSect_firstPt, midSect_lastPt-1, 1);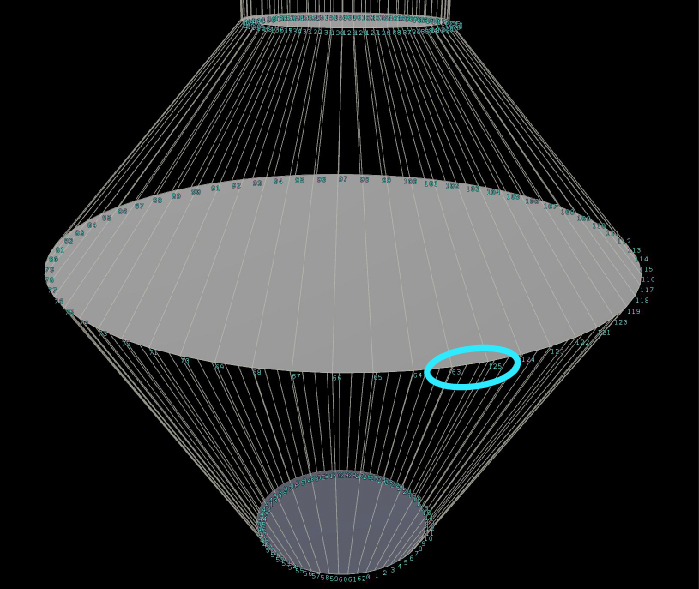
Last Edge to select between the point number 63 and 125.
The last line of code is a repeat calling the setedgegroup one last time. This is necessary because we need to select the last edge which is between the first point on the circle and the last point, which the for loop doesn’t count.
In this case since I have 63 points per circle, the for loop only counts from 63 all the up to 125, but I need the edge between 125 and 63.
This is the reason for the last repeated call for the setedgegroup function on the last line of code.
Houdini Modeling
To be procedural or not procedural?
Houdini modeling isn’t as famous as Houdini is for creating physical simulation scenes like ocean water waves, explosion pyro fire and smoke, or even destruction of buildings. But Houdini is actually a very excellent tool for procedural modeling.
In this article, I explore how to utilize Houdini’s node based workflow and its uniquely assigned point numbers to create a simple bottle geometry. By creating a simple bottle geometry, I demonstrate several different Houdini Modeling techniques. I hope you take away from this is how I used the techniques and applied them to create different parts of this project. These techniques can be applied to almost any geometry.
If you have a geometry in mind, try to simply it into smaller shapes. For example, if you’re thinking of modeling a car in Houdini, then start with a rectangular box as the main body and another rectangular thin boxes as the doors. Cylinders can be the wheels. At the beginning it won’t look like a car, but start with simple shapes and get the outline or silhouette of the car, you’ll find this to be a lot easier down the road.