"set_density" Deep Dive into the Math Behind It
Download Houdini Project File: Whitewater sim.hiplc
This post explains a specific node, “set_density” and how the math works in calculating the density attribute. I’ll try to explain the math behind it and how the node works.
What is this “set_density” node?
I made two tutorial videos about generating whitewater for visual effects using Houdini, one video describes the process using Houdini’s Shelf Tools and the other video demonstrates how to generate the whitewater using the old fashion manual method, node by node.
In both scenarios, you’ll encounter a node named “set_density” and it uses a bunch of attributes given by the whitewater solver and adds some smart math to it to calculate new density information that is used to drive the materials for rendering.

Age, foam location, and depth attributes used to calculate density

Whitewater Solver attributes used to calculate density
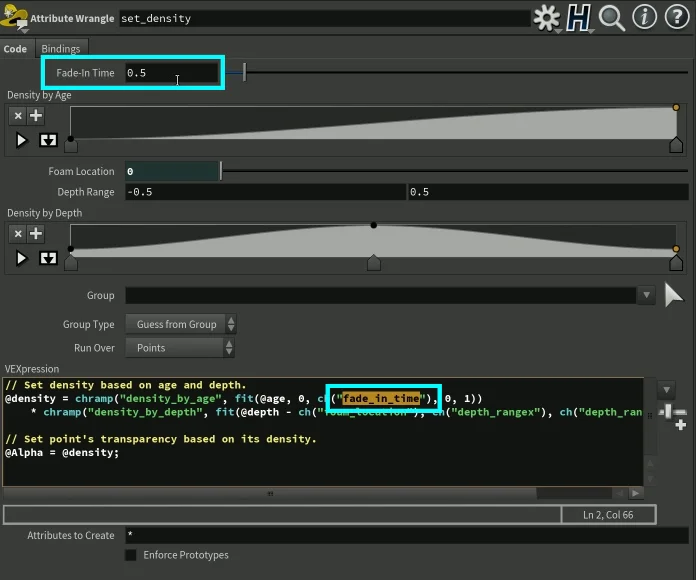
// Set density based on age and depth.@density = chramp("density_by_age", fit(@age, 0, ch("fade_in_time"), 0, 1)) * chramp("density_by_depth", fit(@depth - ch("foam_location"), ch("depth_rangex"), ch("depth_rangey"), 0, 1));// Set point's transparency based on its density.@Alpha = @density;This is SideFX’s original VEX code within the “set_density” attribute wrangle.
Let’s take this thing apart for analyzing.
The @age attribute is given by the whitewater solver and the “fade_in_time” is a parameter controlled by the user.
fit(@age, 0, ch("fade_in_time"), 0, 1)This line of code puts the @age attribute value of each whitewater particle on a scale between 0 and “fade_in_time”. As “fade_in_time” increases, this new scale gets longer, the scale gets more units. If we take the screenshot on the right as an example, the new scale will be ranging from 0 to 0.5. Whatever the @age attribute value is between 0 to 0.5, that ratio will be used to remap to another value between 0 and 1.
Now for example, if a particular whitewater particle has an @age value of 0.25.
0.25 is halfway between 0 and 0.5, it’s exactly in the middle. Then the remapped value between 0 and 1 will be 0.5.
What happens when “fade_in_time” increases?
As “fade_in_time” increases, the remapped value of @age will be smaller. Meaning this line of code:
fit(@age, 0, ch("fade_in_time"), 0, 1)will result in a smaller number.
Let’s give this piece of code a nickname to easily reference it. I’m going to call it, remapped_age.
remapped_age = fit(@age, 0, ch("fade_in_time"), 0, 1)Now let’s analyze more of the code
chramp("density_by_age", fit(@age, 0, ch("fade_in_time"), 0, 1))I’m going to use my nickname and rewrite this line of code:
chramp("density_by_age", remapped_age)
All this does is look up a value on the ramp at position “remapped_age”.
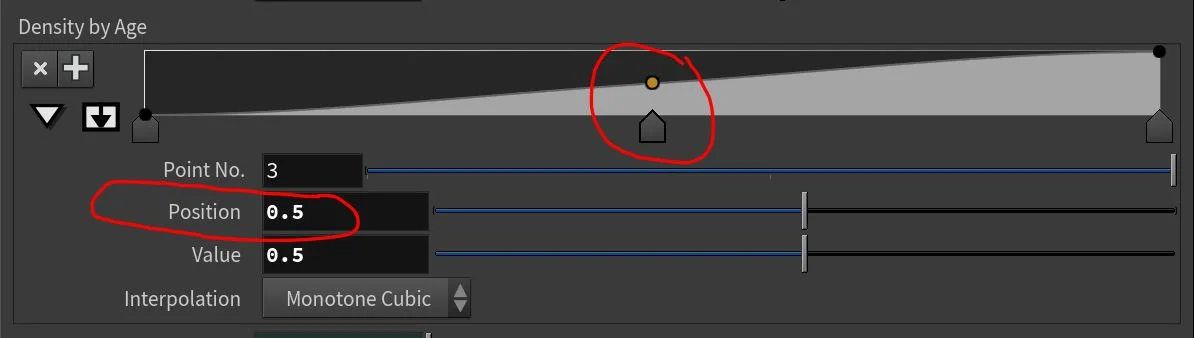
I put a peg in the middle to show its value.
In our pretend example, we said that the whitewater particle is @age of 0.25, therefore the its remapped value was 0.5. On the ramp at position 0.5, the value is? Please refer to the screenshot on the right, for the ramp titled, “Density by Age”.
chramp("density_by_age", fit(@age, 0, ch("fade_in_time"), 0, 1))As “fade_in_time” gets larger in value, this line of code will result in choosing a value that is closer to the left side of the ramp, because “fade_in_time” causes the scale of the ramp to be stretched.
NEXT!
chramp("density_by_depth", fit(@depth - ch("foam_location"), ch("depth_rangex"), ch("depth_rangey"), 0, 1));Taking this apart, let’s focus on the the subtraction first:
@depth - ch("foam_location")
foam location in “set_density” node
All this is doing is taking the @depth value and subtracting it from the “foam_location” which is a parameter controlled by the user.
The foam location in the tutorial video is the top (up direction) surface of the FLIP fluid. Using the tutorial video as reference, it will be the highest point in the FLIP fluid.
Depth is the distance between the surface and the particle. Why would we need to subtract it?
That’s a good question! At first I thought the same, but then I realized that “foam_location” is controlled by the user in the whitewater solver. It is the highest plane or highest point where the whitewater solver can produce foam particles.
In the video tutorials, foam_location was always 0, but what if we set the foam_location to be -10 or positive 10, then things will get interesting. By subtracting the foam_location from the @depth value, we get a distance between the whitewater particle and the water surface.
Let’s make another nickname:
distance = @depth - ch("foam_location")Original line:
fit(@depth - ch("foam_location"), ch("depth_rangex"), ch("depth_rangey"), 0, 1)Renaming it with our nickname:
fit(distance, ch("depth_rangex"), ch("depth_rangey"), 0, 1)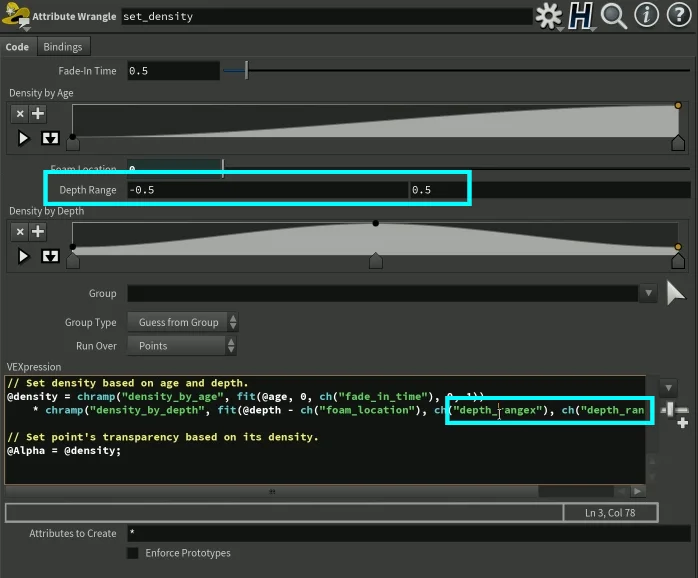
“depth_rangex” & “depth_rangey" are both controlled by the user.
This allows us to control exactly how long the scale we want. If we want our nicknamed distance value to have smaller remapped values or larger remapped values. We can change all that by changing the “Depth Range” parameters.
Nicknaming this one to custom_range:
custom_range = fit(distance, ch("depth_rangex"), ch("depth_rangey"), 0, 1)Renaming it with nicknames:
chramp("density_by_depth", custom_range);If our nicknamed distance results in a smaller value then whitewater particles that are deeper will get values from the right side of the “Density by Depth” ramp. And if the distance results in larger values, we will most likely get values from the left side of the ramp.
Putting it All Together!
density = chramp("density_by_age", remapped_age) * chramp("density_by_depth", custom_range);which is actually:
density = Density by Age Ramp * Density by Depth RampRamp Determines Density
The smaller plots of mountains we put on the ramps will result in super small density values, because both ramps are 0 to 1. If you multiply something like 0.9 * 0.9, it will result in 0.81, which is smaller than the original 0.9. The number can only get smaller or equal, because we could always have 1 * 1.
1*1 = 1, Perfect for Render Materials
The highest number on both ramps is 1. 1*1 = 1. You can not have a density higher than 1, which makes it perfect for setting up materials, because the color ramps in the render materials are 0 to 1 range.
density = Density by Age Ramp * Density by Depth RampWhat I’m trying to say is, both ramps’ values are exaggerated. If you have a lot of small values plotted on the ramp then these small values will result in even smaller values for the density.