Blender Boids! Particle System!
Blender’s Boids particle system is SO EASY to create large scale complex scenes! Sometimes I can’t wrap my head around how good this software application is and it’s all free! Being a huge Houdini fan, I can’t resist the need to compare Blender’s Boids particle system to Houdini’s Crowd’s simulation.

Blender Boids with Animated Fish rendered with Cycles
Blender Boids simulate Fireflies Scene & Rendered with Blender Eevee & Tree Asset from CG Geek’s Tree Collection
Quick Boids Demo
On the right is a quick video tutorial to get you started on how to setup a simple boids simulation in Blender.
Controlling Motion

Blender Boids with CC3 Toon Character & iClone Animation rendered with Eevee
You can easily control how the boids system react to the surroundings by adding simple rules.
Goal
Avoid
Separate
Flock
Follow Leader
Average Speed
Fight
Download the Blend File from the Examples Below
Download Blend Examples: Boids Example.blend
Fixed Goal

Blender Boids follow Fixed Goal
When the boids follow a fixed goal, it may overshoot the goal at times and you’ll end up with a back and forth effect. The boids will continue to circle back to the goal and keep overshooting it as well.
Moving Goal

Blender Boids follow Moving Goal
In this example, the goal is constantly moving up and down and the boids eventually catch up to the goal’s rhythmn however there is a downside near the end of the animation.
The boids bunch up into a small cluster which isn’t very interesting to me. In the next example, we’ll fix this.
Avoid Collision

Blender Boids Avoid Collision & follow Moving Goal
I added an additional rule, “Avoid Collision” rule to the Boids system in Blender. This tells the boids to avoid each other and do not overlap in order to prevent the clustering near the end that you see in the above animation. If you look carefully at this Avoid Collision animation, you’ll notice that the boids do not overlap each other.
This creates a way more interesting effect!
Follow Goal

Blender Boids Settings - Follow Goal
Avoid Collision & Follow Goal

Blender Boids Settings - Avoid Collision
Adding Animation

Bee flapping Wings Animation modeled in zBrush & Rigged in Blender & Rendered with Eevee
Birds flapping, fish swimming, or even zombie walk cycles can be added to the boids in Blender’s particle system. Very similar to instancing an animated object to the particles that are randomly scattered around the scene, you can do the same with boids. It’s one of the easiest ways to get a flock of birds in the scene.
The first step is to animate your character before attaching it the boids.
Link the Animated Object to Boids System

Blender Boids - Instance Animated Object & Rendered with Eevee
Next link it to the boids system in order to instance a copy of your animated object, in this case it’s my flapping bee to the boids system.
In the animation on the right, a single animated object is attached to the Boids system. My animated flapping bee, keep scrolling down to see the difference between adding children to the Boids system. It’ll create a much more interesting effect without needing to recook the simulation!

Blender Boids Settings - Instance Object to Boids
If you have variations of different bees that you want to add to the boids, you can use Instance Collection instead of Instance Object.

Blender Boids Settings - Instance Collection to Boids
Animated Character with Multiple Parts
Blender Shape Keys
If you have a character that has multiple parts that are animated differently, for example the wings on your bird might be a separate object and you might be wondering how would you attach multiple objects as one to the boids system.
First you will need to join the objects together, because Blender’s boids system works with one data object as a single instance for each boid agent. So the multiple parts will need to be joined into a single object character, but this also creates another issue with the animations! After you join the parts together, you’ll find that you loose the animations on each individual objects.
You can use shape keys in Blender. This allows you to morph a character into a different form, or in this case it would be morphing it through an animation.
Enable Children on Boids

Blender Boids - Bee Chase Rendered with Eevee
You’ll find that by simply enabling the Children option on Boids creates a lot more interesting results, especially for this bee chase scene. It creates the number of the boids without additional simulation! It simply uses the existing boids simulation and adds more instances in a scattered form.
Side by Side Comparison
Without Children

Added Children
Boids Setting without Children

Blender Boids Settings No Children
Boids Setting Added Children

Blender Boids Settings Add Children
Adding Animated Characters to Boids

Flapping Bird textured in zBrush & Animated in Houdini & Rendered in Blender Cycles

Blender Boids simulated Flocks of Birds & Rendered with Blender Cycles
Walk Animated in Houdini & Rendered with Blender Cycles & Mech Asset from Jama Jurabaev's Collection
Blender Boids simulated walking Mech Army & Walk Animated in Houdini & Rendered in Blender Cycles & Mech Asset from Jama Jurabaev's Collection
Blender vs Houdini
Blender’s Boids particle system is much easier to use in comparison to Houdini’s Crowd sims, that’s for sure. But what happens if I wanted to create a more advanced scene with a higher level of intelligence in the Boids system?
Can Blender handle it?
Will it be possible?
Even if it’s possible, will it still maintain the easy few clicks workflow, or be even more complex than Houdini when you add more complexity to Blender’s simplified Boids system?
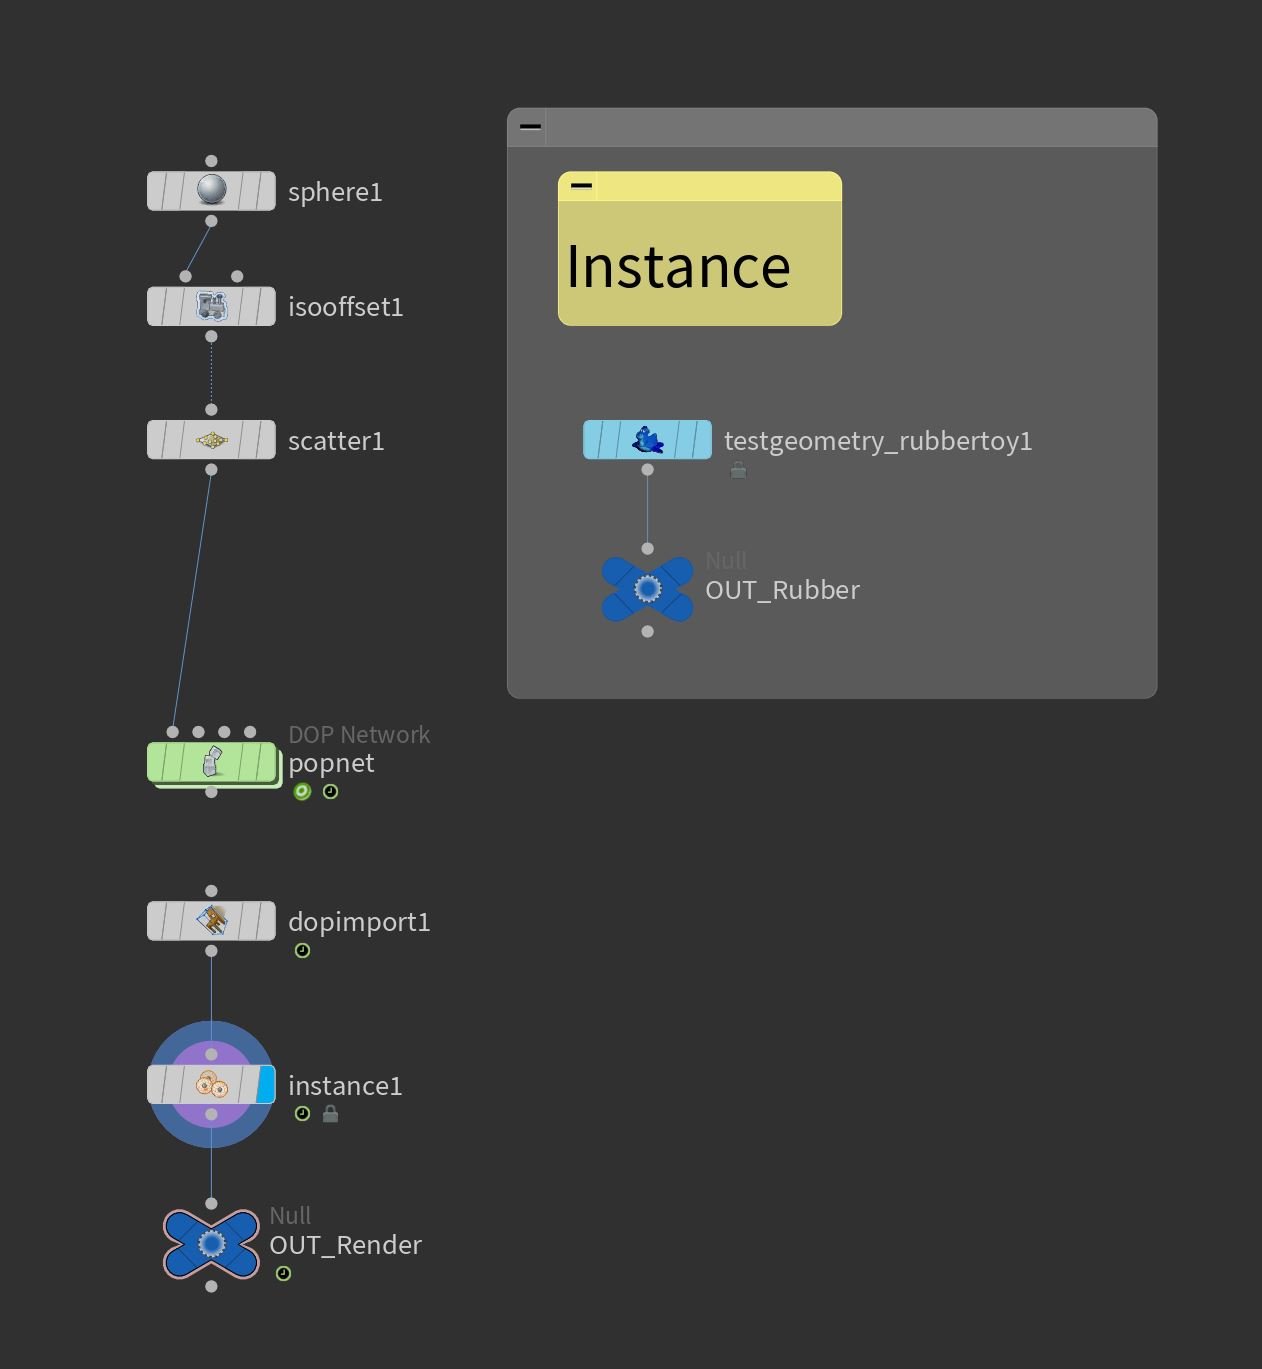
Houdini Flocks of Rubber Toy (POPNET)
Houdini Flocks of Rubber Toy POPNET & FlipBook Render
Blender Boids with Flock of Birds
Blender Boids simulated Flocks of Birds & Rendered with Blender Cycles
Workflow & Level of Difficulty
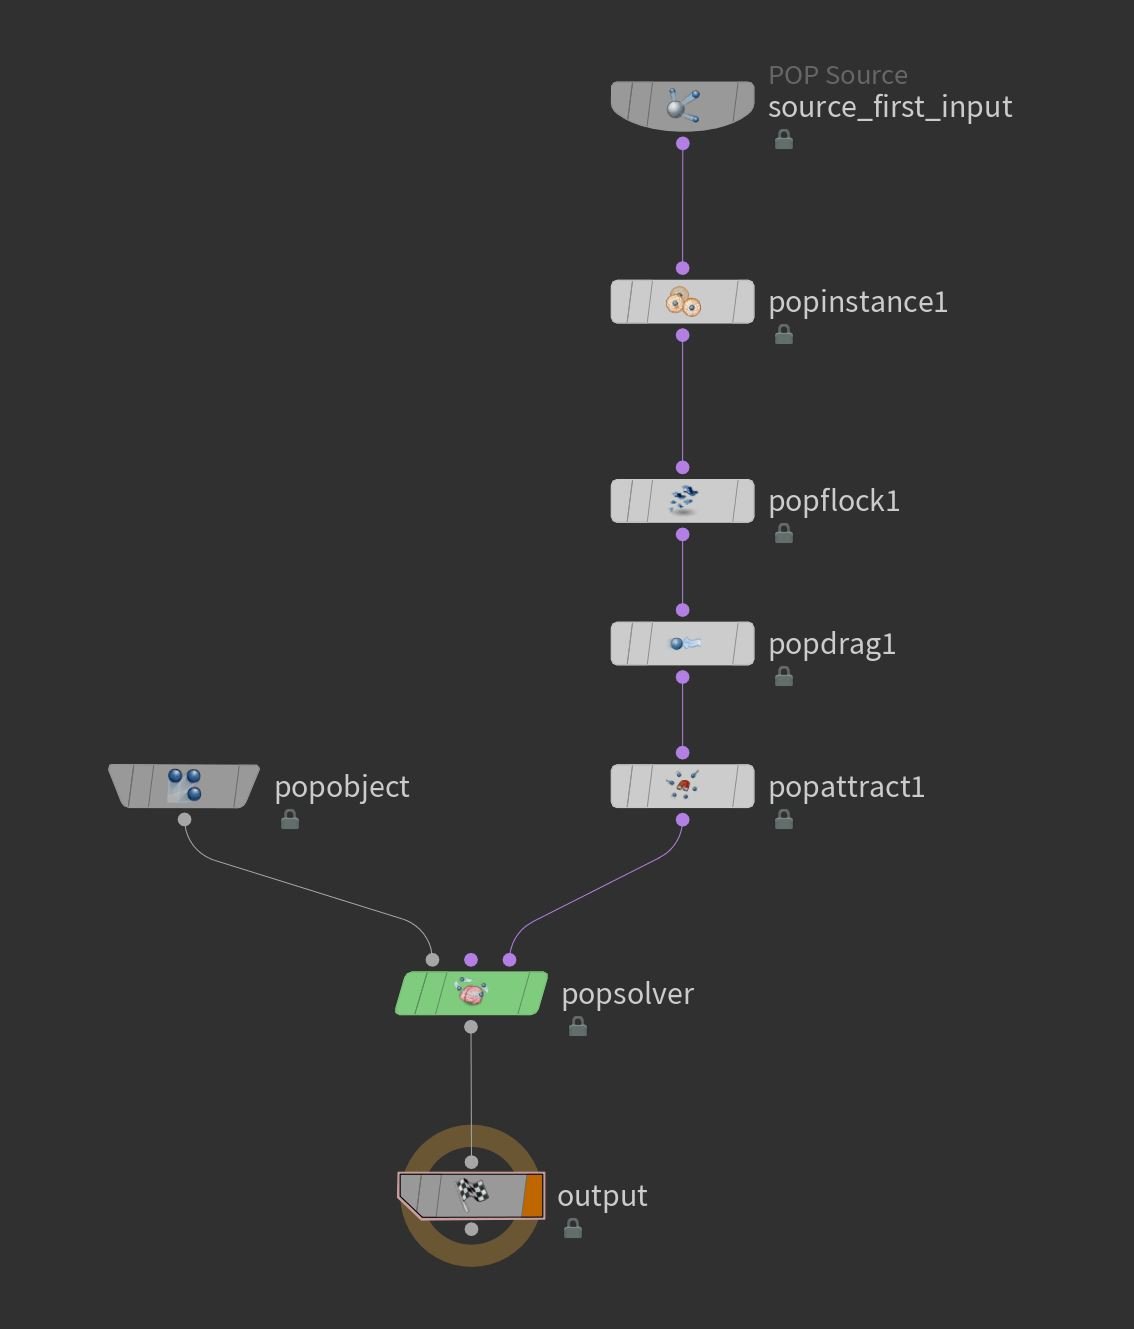
Particle POPNET setup in Houdini (Node Network)
Blender wins this category by far! The boids system in Blender only took a few seconds to create and minutes to tweak. Just watch the Blender Boids tutorial I made and you’ll be an expert on Boids in less than 10min. If you wanted to be fancy, you could spend more time on it perfecting it. The level of difficulty is zero and the learning curve only takes 10min, with tons of content on Youtube with video tutorials on Blender’s Boids system.
Particle POPNET setup in Houdini (Node Network)
If I were to recreate a similar scene in Houdini, it wouldn’t be as easy. Creating a Boids-like particle system may require some more time when compared to the Blender Boids workflow, however there are several different ways you could create this effect in Houdini which gives way more flexibility and leaves a lot more room for creativity. You can use Houdini’s particles network to create the same follow goal effect. And POPNET (particles network) in Houdini provides a lot of different POP forces, effects, vector fields, and many different node features to manipulate the particles and instance a character onto the particles to create a similar Blender Boids effect and more.
Crowds in Houdini
Crowds in Houdini will allow you to attach your favorite rigged characters which will make the scene much more interesting! Crowds in Houdini contain triggers that adds more intelligence to the swarm of characters and you’ll find that creating realistic crowd battle scenes are much easier in Houdini.
Large Scale
These are all questions that I think Houdini will always come on top, because of the fact Houdini was designed to handle large amounts of data without the UI becoming sluggish. Blender on the other hand, becomes quite sluggish very quickly when you increase the poly count or increase the scale of your scene.
Affordability
Blender is free and that means a lot, because affordability is a huge factor to consider when working on any project. Budgeting needs to be taken into account even when working on personal projects! It doesn’t matter if you’re super rich, if you don’t optimize your scene, you will eventually run out of resources to be able to handle large scenes. So it’s not always about money or how much fancy hardware you throw at the application. You need to budget your ram, time, and computer resources for any project!
Power of Procedural
Blender may be free, but it lacks the procedural workflow that Houdini has to offer. Houdini can allow users to easily create generators or asset nodes called HDA’s that will create larger assets very easily. This means you can potentially be a one-person army when it comes to down to creating a large project and still get the work done in a timely fashion. Blender being free, but not as the procedural level that Houdini is on may be hard to do everything all by yourself for certain projects. For example, you may need to buy certain assets to be used in your Boids simulation, like animated swimming fishes that are instanced in the Boids Particle simulation. You could manually model each asset and create your own asset library to use, but I think Houdini may win this round, because of Houdini’s procedural workflow allowing users to create assets with a much faster workflow.