Mocap Dev Journey - Log #1 Tracking to Software
Motion Tracking with Google’s Mediapipe
Finger Tracking using Google's Mediapipe into Houdini
I came across Google’s Mediapipe python module very randomly while researching more about OpenCV and python scripting. At first testing it seemed so promising! With an ultra fast webcam capturing frames at 90fps, I was able to capture the motion of my fingers with less jitter noise. The smooth animation is probably all thanks to the 90fps of my webcam.
Motion Capture using a Webcam
Motion Capture usually requires special devices with depth sensors, but being able to capture and motion track my fingers with such accuracy with only a webcam was very exciting to me!
Retargeting
Finger Tracking using Google's Mediapipe and retargeting into Houdini using KineFX
I then took this proof of concept further and tried to retarget the animation onto a character and that’s where my nightmare started. As a Houdini user, I used the KineFX system to try to retarget the raw data I got from my Mediapipe script I created and remap it to Erik, which is a SideFX open source rig.
Don’t be fooled by the animation on the right! It seemed like it some work works, but if you look carefully!
Finger Tracking using Google's Mediapipe and retargeting into Houdini using KineFX
A closer look at the joints, the finger rotations are actually all messed up, especially the thumb. And when the right hand clearly does a V sign having two fingers straight up, the character has some sort of weird curl.
The results were really bad. The orientations were all messed up! Even though I had nice coordinates, that didn’t help the rig because I needed the orientations of each bone and joint! That’s when I realized I needed to figure out how to calculate the offset rotational angles from rest position to whatever was being tracked on the webcam.
Calculating the Angles…
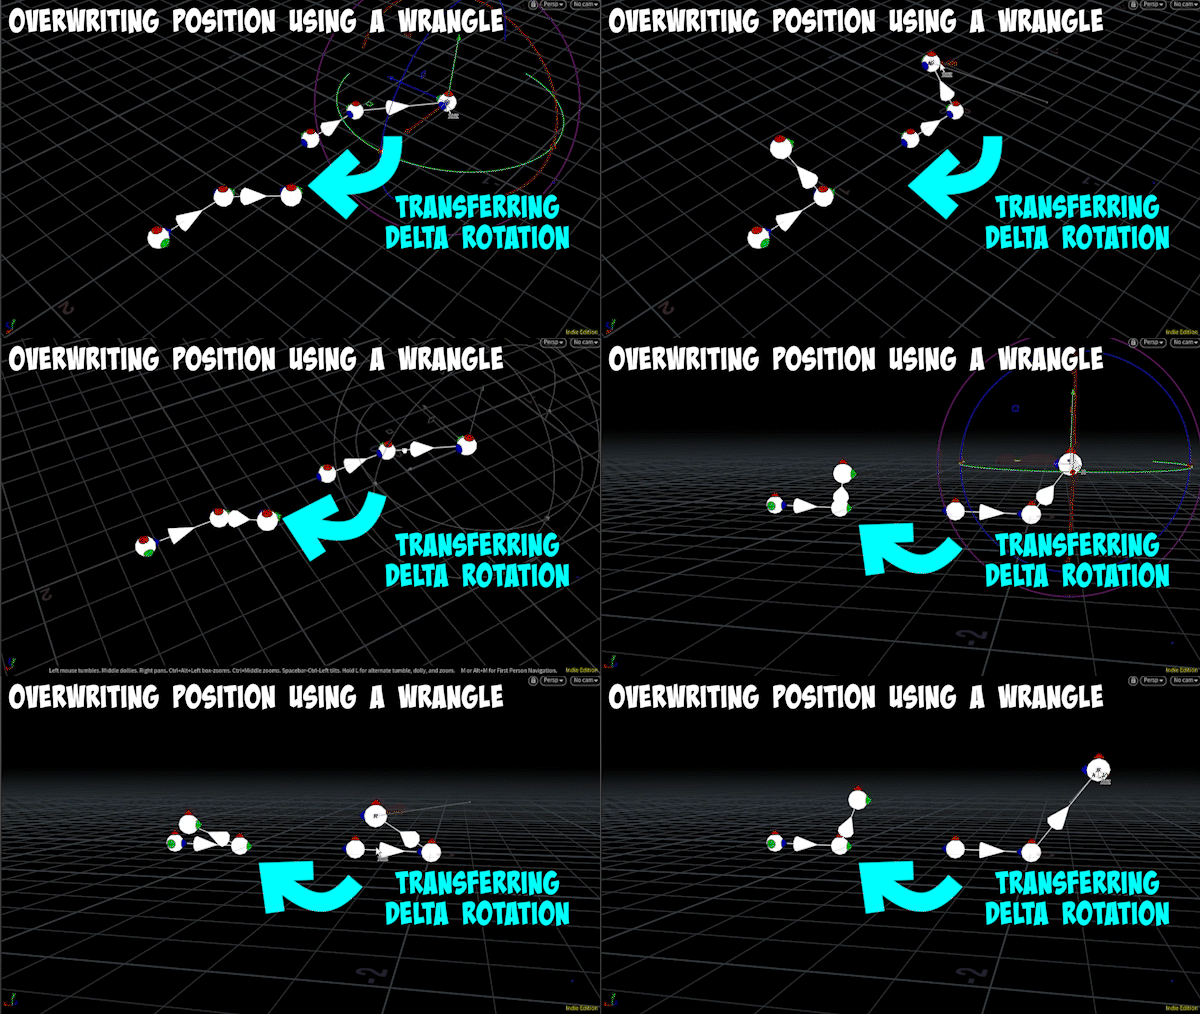
First Attempt in Calculating the Delta Rotation and Transferring it in a Wrangle in Houdini
Reverse calculating the angles from the finger tracked data was absolutely horrific! Luckily I was also doing a mini-series tutorial on Cross Product and all the math was still super fresh in my mind.
I needed to first figure out the finger bone angles being tracked from Mediapipe, which at first seemed easy enough to do in Houdini with the all mighty power VEX functions! My first test was transferring angles from one pair of vectors to another pair on the same orientation. Worked like a charm!
But then I changed the orientation and everything went berserk!
Calculate Rotation Angle and transfer to another vector Test Scene in Houdini
Calculate Rotation Angle and transfer to another vector Test Scene in Houdini
Local Transformation Matrix
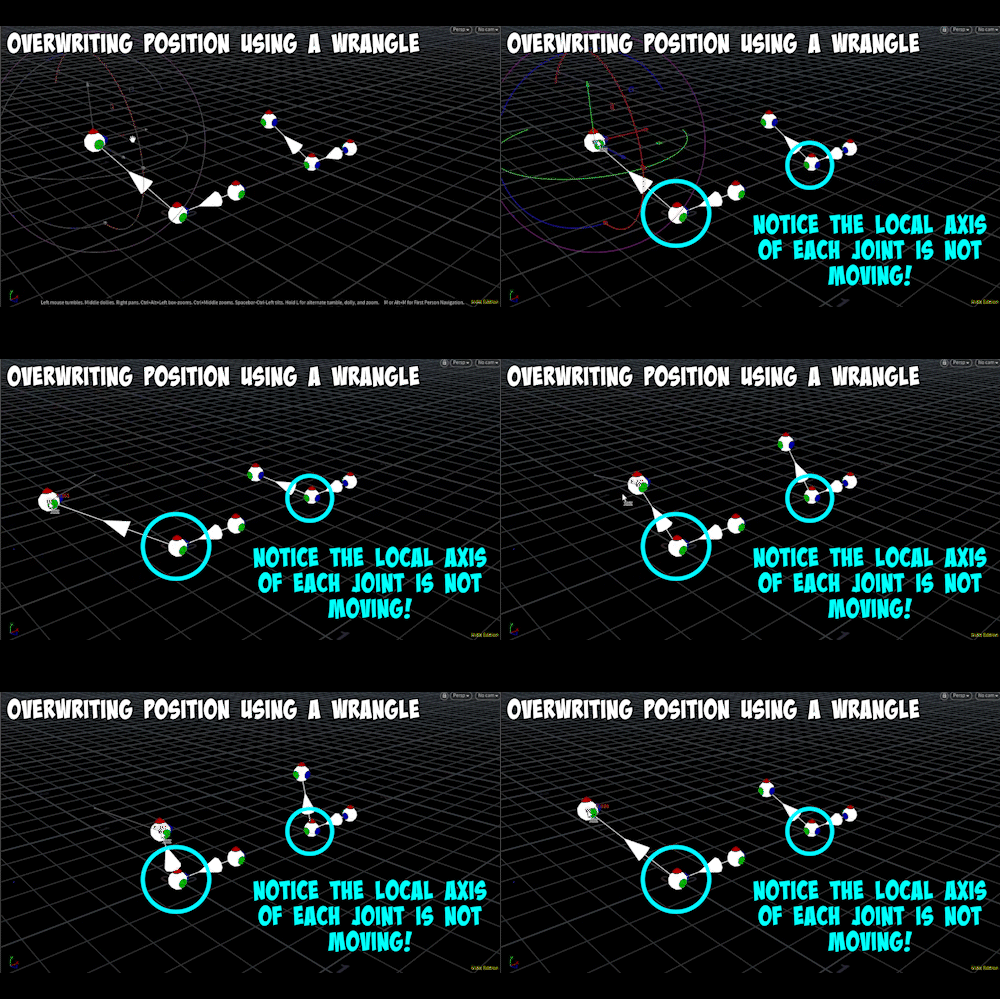
Local Axis of Joint is not Updating when attempting to transfer delta rotation angle
This is where I realized the importance of using the local transformation matrix that comes with every KineFX skeleton in Houdini. Other 3D software probably has their own way of maintaining the local rotation data for each joint.
Notice the little red, green and blue hats on the white balls. The white balls represent the joints of the rig and the RGB colored hats represent the local axis of each joint. In the above attempts to transfer the delta rotation angles, my local transformations are not moving at all! This means I am NOT rotating the joints. I was simply overwriting the final position of the end of the bone, which sort of destroyed the local transformations. Well to the least the local transformations no longer made sense when I forcefully overwrite the positions to match the mocap.
You have to figure out the delta rotation and the find out the axis of the rotation, which really means where to rotate and how much to rotate. I also needed to use the Rig Attribute Wrangle to update the localtransform attributes stored within each joint of the KineFX rig in Houdini. This is more of a Houdini thing and I believe every 3D application software will have its own way of storing and manipulating this data.
With this new knowledge, I started changing the way I calculate the offset angle and if you read on, you’ll see the little by little progress I make along my journey.
Using Dihedral Angles
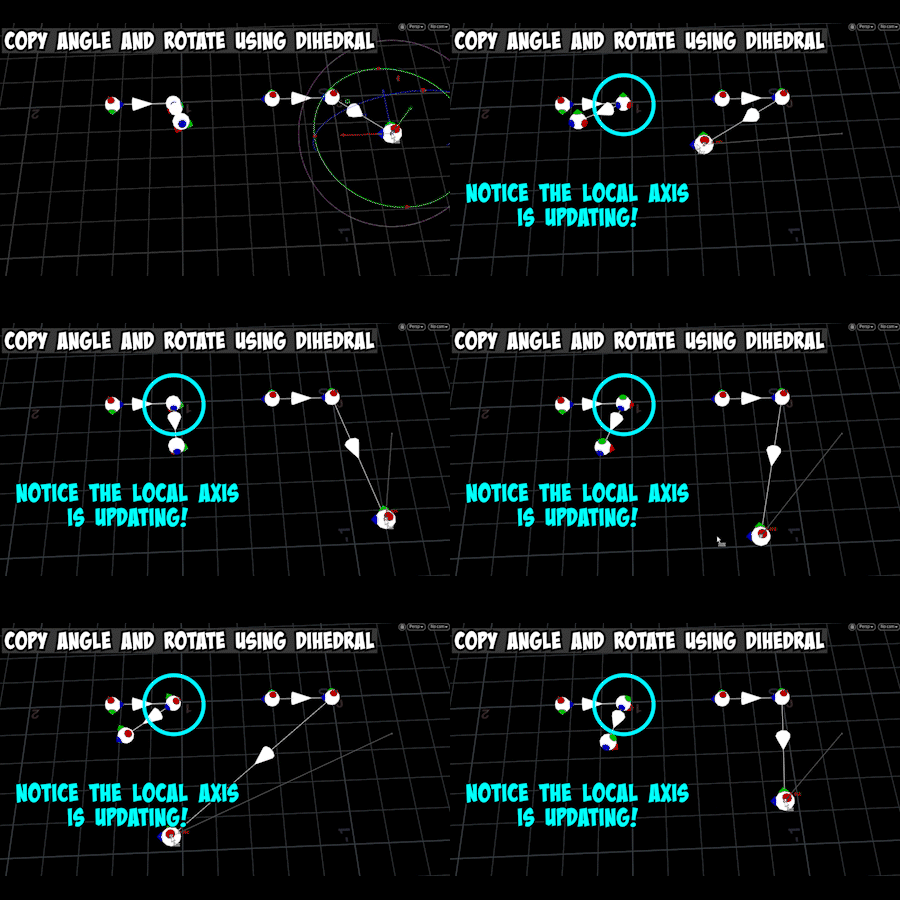
Using Dihedral Angles in Houdini to Calculate the Angle and Transfer it to another Vector
I used Dihedral angles to calculate the angle between two vectors and reapply this angle to rotate that local transformation matrix for the joint and thus transferring the offset rotation to another vector.
This worked extremely well! Notice the local axis on the rig on the left, it actually turns maintaining a good rotational state for the rig. This will be a key part in transferring the raw mocap data to my character rig. The raw mocap data doesn’t contain any rotational delta information or orientation and that’s what needs to be mathematically derived from scratch! These rotations are the key essential information that a character relies on to get good animation results.
Using Dihedral Angles in Houdini to Calculate the Angle and Transfer it to another Vector
It even passed my orientation test. I rotated the rig to see if the transfer would still work out and it did!
Bones & Joints Chain Reaction
Rotating Hand changes Fingers to change orientation in a chain reaction of bones in a rig
Even with all my efforts put into calculating the rotations and transferring it over, it worked with a simple one to one vector pair example; the only thing I didn’t see coming was the fact that a rig has many joints linked and one change in the rotation of a parent bone will cause a chain reaction in all attached children bones. This was especially important for the hands and fingers. When the hand rotates upwards, it changes the orientations of ALL fingers attached to that hand.
For example if you’re calculing the angle from the tip bone of the index finger to the hand bone will change in a chain reaction when the hand bone rotates, even if the fingers don’t move. This is the chain reaction because all the finger bones are linked to the hand bone and inherits the hand rotations. So the way I was calculating the axis of rotation was completely off when the parent bone (which is the hand bone in this case) rotates. It’s a whole chain reaction coming from the hand all the way down to the finger bones.
Rotating Hand changes Fingers to change orientation in a chain reaction of bones in a rig
It gets worst! After inheriting the hand orientation, the finger bones can also rotate independently on its own. This adds even more difficulty in trying to calculate the delta rotation of each finger bone in order to transfer it to another rig. You may question if we could copy the hand rotation and therefore the finger delta rotations would eventually work out. Theoretically yes, but that’s not what I want to do, because that means you have to transfer the rotations for each joint in a specific order and it’s too inflexible. I want to eventually take this functionality to a new level and add additional creative features in the future and therefore I would need a stable and reliable system as a foundation.
This insight made me realize the real complexity of calculating the delta rotations was a lot more than I expected and I started deviating from doing things manually and mathematically to try to ease my brain. In the next section, you’ll see I try to use other ways in Houdini to rebuild that joint axis and local transform data.
Trying to Match the Local Rotations
Up until now I was trying to programmatically change the position of each bone tip to match the angle of the mocap data and this doesn’t update the local axis of each joint, which is stored in an attribute called the “localtransform” in Houdini. I tried many simpler ways to update this data in Houdini and avoid complex angle calculations, but all attempts failed.
Houdini’s Rig Doctor
Houdini has this node called “rig doctor” which automatically calculates and updates the local transformation information and this updates the local axis of each joint, which was my first attempt, because this was exactly what I needed! However it isn’t able to detect the new rotation or orientation of the axis bone.
The picture on the right shows you what happens when I apply the rig doctor and attempt to fix the local axis on the elbow joint. The green hat on the elbow is pointing towards the right. In the picture above, which shows the proper local axis in a similar pose; the green hat (Y-axis) is pointing upwards. This is the proper elbow axis for this pose of this particular rig.
Since this method failed, I went back to trying my angle calculations, but this time at least I know that I need to update the localtransform attribute and I need to use a rig attribute wrangle instead of the ordinary SOP wrangle nodes in Houdini.
End of Dev Log #1
This is where I’m currently at, but I feel like I’m really close, even though I also feel like I haven’t made much actual progress. I think most of the progress made is in the knowledge. The things I know now, if only I knew before I started this, would have probably made this dev log a lot shorter.
I’m going to end it off with some of my goals and a short intro in what is my current equipment I have for motion capturing.
Goals
Everyone wants a full body motion capture, facial capture, finger tracking, and light capturing equipment! The limitation only lies within the budget. With unlimited budgeting, you can always do the impossible. Hollywood has taken motion capturing to a whole new level and we see TV shows, like Alter Ego that uses real time mocap for recording and live airtime. $1M 360° LCD screens to reconstruct the environment lighting and give actors/actresses a better sense of the script.
Needless to say, I’ve always wanted a full body motion capture equipment to create my own in house CG studio. But my budget is a lot smaller compared to any of those things! Then I set out on my journey on different ways to create as best as I could on my budget and in house motion capturing studio as I could afford.
My Current Setup
The webcam I’m using the Logitech Brio 4K, which is capable of 90fps at 640x480 resolution. The 90fps option isn’t available out of the box and I was only ever able to achieve it by setting it in OpenCV. Even with it set there, I haven’t had a 100% way of confirming that it’s clocking the full 90fps, which is something I plan tackle to in the future Dev Logs.
I do have a dual Kinect setup with ipisoft as my body motion capturing device, but without finger tracking, I’m not impressed with the results. The character come out rigid and lifeless. That’s when I realized how important finger tracking is, but not cheap! The most affordable commercial solution to finger tracking that I know of is probably the Rokoko Gloves, which will put you back $1245 USD. Still out of my budget.
And this is what inspired me to this project!


