Installing AMD Threadripper 3960x (Gen 3)
Amd recently released their new Threadripper 3960x, 3970x, and 3990x in a whole new lineup of the 3rd generation Threadrippers. With amazing benchmarks and monstrous computing power, it created a huge hype among the computing industry. This was perfect timing for me, because I needed to upgrade my PC as I outgrew my old one. Time isn’t kind to PC components.
Components
I recently went out to purchase a Threadripper 3960x (CPU chip), Asus Prime TRX40 socket motherboard, and Dark Rock Pro TR4 cooler (CPU cooler).
Cooling Down the Threadripper CPU

Threadripper CPU (bottom facing up)
Since the Threadripper models are known to get quite hot very quickly due to the large amount of data that it can process, I decided to get a cooler that was made for the Threadripper socket.
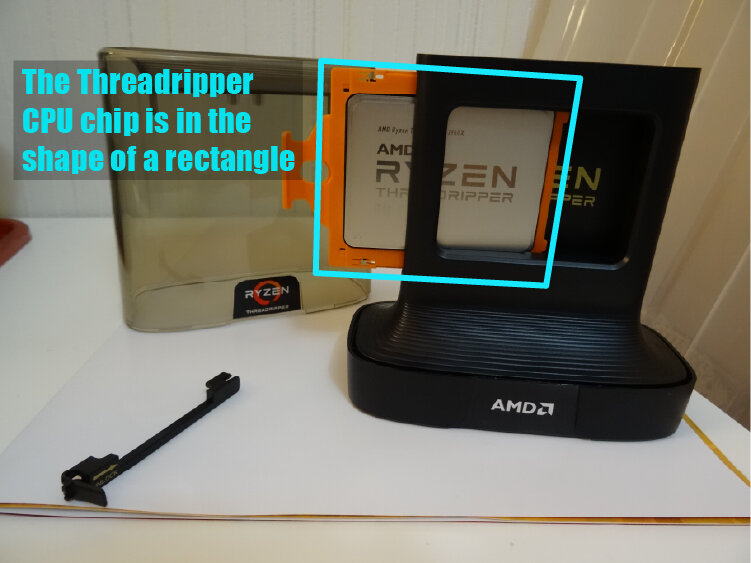
Threadripper Retail Box
The Threadripper CPU lineup has a different shape compared to other CPU’s on the market and has a larger surface area to cool, therefore if you are reusing an older CPU cooler you will need to get an adapter bracket. I don’t recommend this! The Threadripper CPU has a rectangle shape surface and other CPU’s on the market usually have a squarish surface, and if you’re planning to reuse an older liquid cooler, it’s not going to cover the entire CPU surface, because most liquid coolers have a circular shape.
New Motherboard (AMD’s New TRX40 Socket)
The latest 3rd generation of Threadrippers is the first of its kind and AMD decided to change the socket for the CPU chip, which also means that I needed to get a new motherboard. The TRX40 is a new socket and has never existed on the market before, so you can be sure at the time of writing this article that if you go out and buy a Threadripper 3960x, 3970x, or 3990x, then you’ll need to get a new motherboard. The previous 1st and 2nd generation Threadripper motherboards are NOT compatible!
Motherboard Prices
The second hard blow is that the TRX40 motherboard are very expensive. They range from $400 to $1200 USD. Since this project was pushing my budget as it is, I got the cheapest TRX40 motherboard I could find, the Asus Prime TRX40 motherboard, which costs $445 USD on Amazon.com. Now I got mine at a local electronics store which costs around the same after currency conversion. Now keep in mind this is the lower end model of the TRX40 motherboard.
Asus ROG Strix has another TRX40 motherboard that costs $730 USD on Amazon.com, which has better audio, Bluetooth, and more GPU ports (PCIe) when compared to the cheaper one I bought. Asus has another one that’s even more expensive called the Asus ROG Zenith II Extreme costing $1170 USD on Amazon.com. But the Asus Prime model has everything I need for rendering projects, which was the only thing I was concerned about.
Here’s a link to Asus’ site that has a chart comparing all three models of their motherboard.
CPU Cooler Coverage
The shape and size of all Threadrippers including generations 1, 2, & 3, the CPU coolers are backwards and forwards compatible. So if you want to reuse an old CPU cooler from a previous Threadripper installation, rejoice you can save a few bucks. But again, if you’re coming from an Intel machine and migrating to a new Threadripper, you need to know the CPU cookers are not compatible! There is a bracket that AMD gives you that will make other CPU coolers compatible with the TR4 socket size.
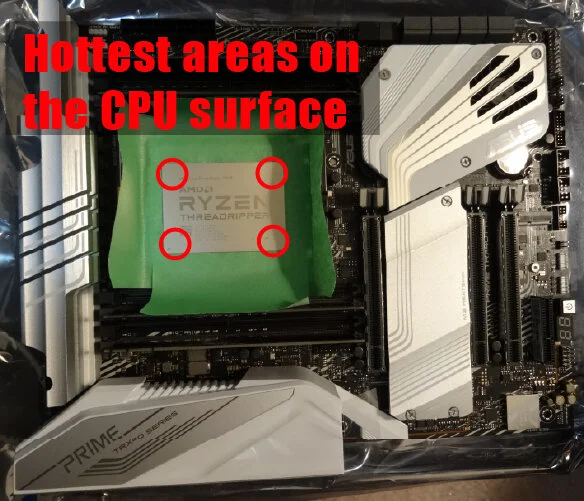
Most of the heat is dissipating on the 4 corners of AMD Threadripper chips
I would not recommend using this bracket to install your circular liquid cooler onto the Threadripper. I would go out and get a TR4 sized liquid cooler, if liquid cooling is what you want. This is because, you’re not going to get a lot of coverage area to cool down the Threadripper CPU. You’re going to miss the corners of the Threadripper and that’s where its the hottest temperatures on the chip. AMD’s Threadripper chip has a different design compared to Intel’s chip or any other chip, which concentrates most of the heat in the center.
So you can see the circular design of liquid coolers isn’t that great for Threadrippers, because it’ll miss all the corners.
Dark Rock TR4 (CPU Cooler)
I wanted the most coverage for CPU cooler, which is also one of the main reasons I choose the Dark Rock TR4, because it covers the Threadripper surface completely. I had looked into getting a third party thermal paste, but after much research found that the Dark Rock CPU cooler comes with thermal paste, so I decided to try that out first and see what the temperatures were like before getting anything else.
The Dark Rock CPU cooler is an air cooler with heat pipes that redirect the heat from the CPU surface to two large heat sink towers. There are two large fans that blow at the heat sink towers which eventually removes heat from the whole contraption.
Air Coolers vs Liquid Coolers for Threadripper (TR4 socket)
I did a bit of research before coming to the conclusion of getting an air cooler vs getting a liquid cooler. And it turns out in a lot of cases, the air cooler did much better than most liquid coolers for the Threadripper chips. This goes back to that CPU coverage. On the market today, most liquid coolers are circular shaped and as I mentioned several times in this post, the Threadripper has a rectangle shape, and most of the heat comes from the four corners. Maximum coverage will benefit you greatly, especially if you intend on overclocking your system.
But do keep in mind, the Dark Rock air cooler is HUGE! And most other air coolers are as well. Beauty vs bronze? The overall assembled PC build won’t look as clean when using air coolers and won’t look as pretty, but it gets the job done. Having said all that, I saw one liquid cooler that is specifically designed for the Threadripper that was available on the market at the time of last year November 2019, when the Threadripper Gen 3 were released. This was obviously super new, so no reviews were available at the time and I had never heard of that particular brand before, but I’m not an enthusiast. In the end I went with the Dark Rock TR4 air cooler.
Great Idea! Corsair Thermal Paste
During my search for a third party thermal paste, I came across Corsair’s XTM50 ($15 USD) and Corsair’s TM30 ($8 USD). This got me super curious as to why the XTM50 cost almost twice as much? Both products contained the same Zinc Oxide thermal compound, so what was so special about the XTM50 that cost more?

The XTM50 more expensive one does have a different thermal compound even though both XTM50 and TM30 are listed to contain Zinc Oxide. I’m guessing they have different mixtures of some sort. According to Corsair’s website, the XTM50 has more thermal conductivity making it better for CPU cooler as more heat can be taken off the CPU surface more quickly.
It turns out the XTM50 comes with stencils that is cookie cut fit to specific CPU sizes. You can then place the stencil over the CPU and apply the thermal paste onto your CPU chip and start spreading it like butter onto bread until you get a thin layer of thermal paste covering your entire CPU surface area. To be honest the stencil doesn’t come close to justifying why this product was priced twice as much! But I thought this was an excellent idea!
If you’re curious to how this stencil works, I have provided an embedded Youtube link on the right that starts the video exactly where they show the stencil.
I would have bought the XTM50 just because I think the stencil is a great idea, but the Threadripper has a different shape and contains more surface area compared to other CPU chips on the market. Corsair didn’t have a thermal paste with stencil that fit the Threadripper and if you clicked on the Youtube video link, you’ll see that the stencil only allows a small cut out in the middle, which for Intel chips makes sense, because that’s where most of the heat will be. However for Threadripper chips, most of the heat is located in the four corners of the chip due to AMD’s unique design.
Applying Thermal Paste to the CPU

Preparing to Apply Thermal Paste (Painter’s Tape around the boundary of the Threadripper CPU chip)
I had a lot of painter’s tape left around the house that I used for my older model 3D printers (that is a story for another time). Anyways, I cut out 4 pieces of tape and taped the boundaries of my Threadripper CPU chip. I had to cut out an additional 4 more tiny pieces of tape to cover the beveled corners.

Preparing to Apply Thermal Paste (Painter’s Tape around the boundary of the Threadripper CPU chip)
Apply the thermal paste onto the surface area of the CPU. Be generous! Next, I used a useless business card to spread the paste evenly across the entire CPU surface area. Be sure to use a business card that you can throw away later, or best to use something like a credit card that’s plastic, but I wanted to keep my credit card so I used a business card instead.
Sorry I didn’t take pictures after I applied the thermal paste, because my hands were all full at that stage. It should look like an thin layer of paste that’s 100% covering the CPU top side.
Lastly, remember to remove all the painter’s tape before installing the CPU cooler!
Installing the CPU Cooler
The Dark Rock Pro had this video on Youtube with very detailed instructions on the installation of their CPU cooler, which was perfect for me. I literally had my laptop playing and pausing the video as I installed this cooler.
Updating Software Licenses
Redshift License
If you have a Redshift license, make sure to deactivate the Redshift before installing anything! You need to reactivate the Redshift license after the installation. I’m not quite sure if I needed to do that, because this was a hardware change to my system. I think the Redshift should be tied to the software in my OS configuration, but I didn’t want to risk it and have my Redshift license stuck floating around.
The reactivation is very easily and only requires a single click. At first, I thought I needed to write down the registration code, but turns out that wasn’t necessary for the reactivation. Redshift remembers it and only requires that you hit the “activate” button afterward your system change.
Windows 10 License

Windows 10 settings (Link to Microsoft Account to preserve your Windows License)
Windows 10 uses the motherboard and CPU as a key that ties to your license for Windows. If you ever change these two pieces of hardware and want to reuse your current hard drive and all of your original OS configurations, you’ll need to sign up for a Microsoft account and link that account to your current version of Windows 10. I learned the hard way!
I never use Microsoft’s email platform or any of their digital platforms. I mean Windows OS is great, but I think that’s as far as I go with their products. And I almost forgot Visual Studio, that’s made by Microsoft too! So I never even bothered to sign up for a Microsoft account. This was a terrible mistake that I learned after I finished installing the Threadripper and fully assembled my new PC.
After having fully assembled my new Threadripper PC, Windows failed to boot properly. It would work normally for 5min and force me to reboot. My guess is that the 5min was to allow me to sign in using the Windows online account, however as I mentioned I never bothered signing up for a Microsoft account. This turned out to be a nightmare for me…
Rebuilding the Old Machine
The only two choices I saw in front of me at the time was, take apart my new machine and reinstall the old CPU and motherboard, but I didn’t have any extra thermal paste left for a second application. The other option was to assemble a temporary machine using whatever parts I had lying around to get the old system to boot up for 5min so I could do the necessary software preparations.
I had to grab all extra components I had lying around to rebuild my older machine, install the bootable hard drive (my current hard drive) that contained my original Windows OS configuration with the active license which I needed to boot into and create a super quick Microsoft account to link to my Windows license.

Old PC installed and running on a table without chassis
Now I didn’t have much spare components lying around. But luckily I was replacing the motherboard and CPU with a new Threadripper, so at least I had that! And the CPU coolers on my old machine were still stuck on the old CPU, one less thing to worry about. I recently upgraded my PSU, so I had a spare PSU lying around. As for the RAM, I just took one stick off my new motherboard and stuck that temporarily onto the old one to get me through this. Lastly, I popped the GPU off the new Threadripper machine and installed it temporarily onto the old one.
This got me all the essentials I needed to boot my computer up and link that Microsoft account to my Windows license. So I turned on the power on the old PSU expecting my old machine to boot up, but nothing happened…
That’s when I realized, I needed a button to turn the computer on! You need to realize my temporary setup had components lying around the table and all this wasn’t installed properly in a chassis. I had wires dangling all over the table while trying to power it up.
I only have one working PC chassis and that was reused for my new Threadripper machine.
This left me buttonless to power up the old machine.
Custom Power Up Button

Custom PC Power Button
However I wasn’t going to give up yet. I then remembered I had a fancy momentary switch I bought at a DIY electronic store, Adafruit.
I went online and searched for the service manual for my old motherboard to look up where the header pins to power up the machine was located on the motherboard. I took out some jumper wires and hooked up my momentary switch to the pins indicated in the manual, flipped the switch and kept my fingers crossed that I didn’t fry any circuits.

Custom PC Power Button
It started up!
YAY… because I was getting tired. The screen looked weird, but it was readable and all I needed was 5min to link that Microsoft account to my Windows license.

Recreation screenshot of the Window 10 Crash screen
Blue Screen of Death
I was finally good to go with my new assembled Threadripper machine. Windows was properly activated and everything seemed to work fine. But after booting it up and using it for less than 3min, the Threadripper machine just crashed and I got the blue screen of death. No matter what I did, the computer would crash a few minutes after I log into Windows.
I rechecked all my cabling and fans to see if they were installed facing in the correct direction. At first I thought it was the CPU overheating and I started taking apart the CPU cooler fans and putting them back in one more time.
Conflicting Asus Drivers
It turned out the old Asus drivers from my previous motherboard were conflicting with the new motherboard, which was also made by Asus. According to Asus’ documentation, you should uninstall the old drivers before assembling the new hardware. After installing the new hardware, you’ll need to install the new Asus drivers that matches the new motherboard.
Unfortunately, that was a little too late for me at that point in time.
Windows Safe Mode (disable Asus Software)
So, either I pop the hard drive back into my temporarily assembled PC with all the old parts dangling on my desk OR boot my new machine into safe mode and temporarily disable the old Asus software from starting up. By temporarily disabling the Asus software from loading on startup, it got rid of the crashing issue and gave me enough time to uninstall the old Asus drivers. You can’t uninstall drivers in safe mode, thus I needed to do this the long way.
After that, installing the latest drivers for the new Asus Prime TRX40 motherboard was straightforward.